Attachment Source
 Attachment Sources have the ability to automatically acquire or receive attachments. Attachment Sources can be created inside Locations only.
Note
There is a maximum limit of 150 files that can be received per Attachment Source per day. This equates to 1 file every 10 minutes. Each file can be up to 100MB in size. Exceeding this limit will trigger an Overload Alarm on the Source.
Properties
 Configure properties via the Workspaces Tree context menu or List View properties icon. Requires configure permission.
General
The general section allows you to specify attachment storage options.
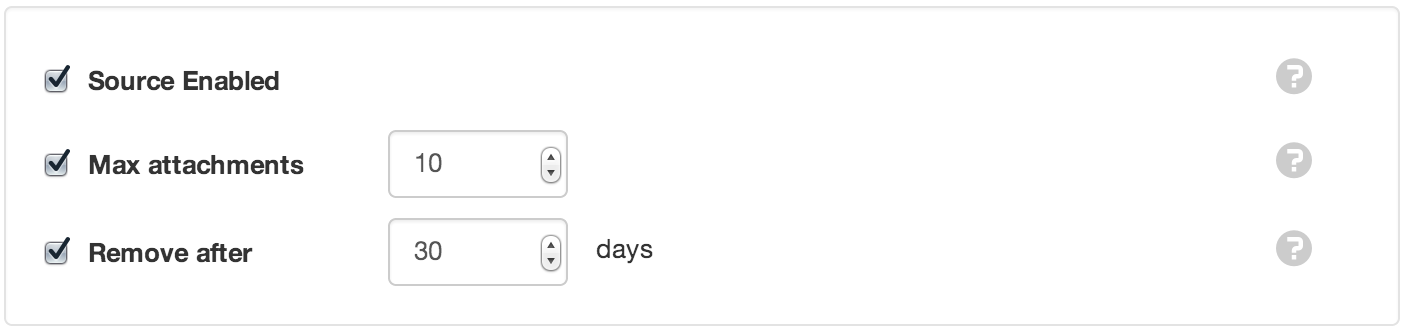
- Source Enabled
- Uncheck the Source Enabled checkbox to stop collection and prevent alarms and notifications from triggering.
- Max attachments
- Specify the maximum number of attachments allowed within this Source. When new attachments arrive and the limit is exceeded, the oldest attachments are removed first. The maximum limit that can be set is 100 attachments per Source.
- Remove after
- Enable this setting to specify the maximum number of days that attachments will be stored within this Source. The expired attachments will only be removed when new attachments arrive.
Connection
Configure how you would like to connect to your attachments.
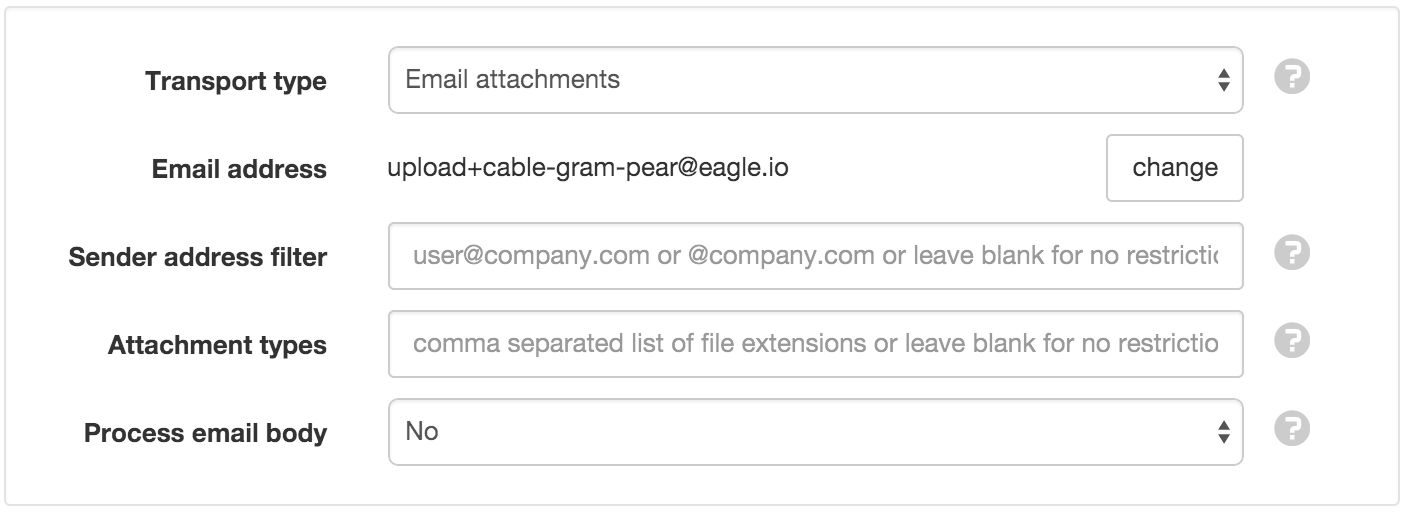
- Transport type
Select the transport used to acquire attachments.
Email to eagle.io
Email attachments using the auto-generated address exactly as shown.
Note: The maximum accepted size per email (including all attachments) is 25MB.
Upload to ftp.eagle.io
FTP your files to ftp.eagle.io using the auto-generated user name exactly as shown. Password is optional. Use Tcp port 21 for standard Ftp and Tcp port 990 for implicit SSL.
Note: Only one concurrent ftp connection is allowed per Source. The maximum accepted size per file is 100MB.
Upload to sftp.eagle.io
SFTP your files to sftp.eagle.io using the auto-generated user name exactly as shown. Password is optional. Use Tcp port 22.
Note: Only one concurrent sftp connection is allowed per Source. The maximum accepted size per file is 100MB.
- Email address
- Email your attachments to this address. Click change to generate a new email address.
- Ftp user
- The user name to use to login to the Ftp server. Click change to generate a new Ftp user.
- Sender address filter
- For added security you can filter attachments by sender email address. Restrict to a specific email address or to a specific domain. eg. user@company.com or @company.com. Leave blank for no restriction.
- Attachment / File types
- Restrict which file(s) get processed as Attachments by specifying a comma separated list of file extensions. eg. jpg, png, mp4 will process standard media files and ignore all other file types.
- Process email body
Specify if the email message body should also be processed:
No only the attachments will be processed.
Plain Text will store the text content of the email in addition to any attachments.
HTML will store the HTML content of the email in addition to any attachments.
- Communications Alarm
- See Alarms and Notifications.
Collection
- Outdated Alarm
- See Alarms and Notifications.
- Overload Alarm
- See Alarms and Notifications.
Security
The Security section displays a list of all users and groups that have access to the Node. Users with security permission can restrict user and group access to the node and its descendants by assign the No Access role.
New users and groups must be added via the Workspace Security section.


Note
The Account Owner, Administrators or Workspace users/groups that have been assigned a Workspace role with the configure permission can not be assigned the No Access role.
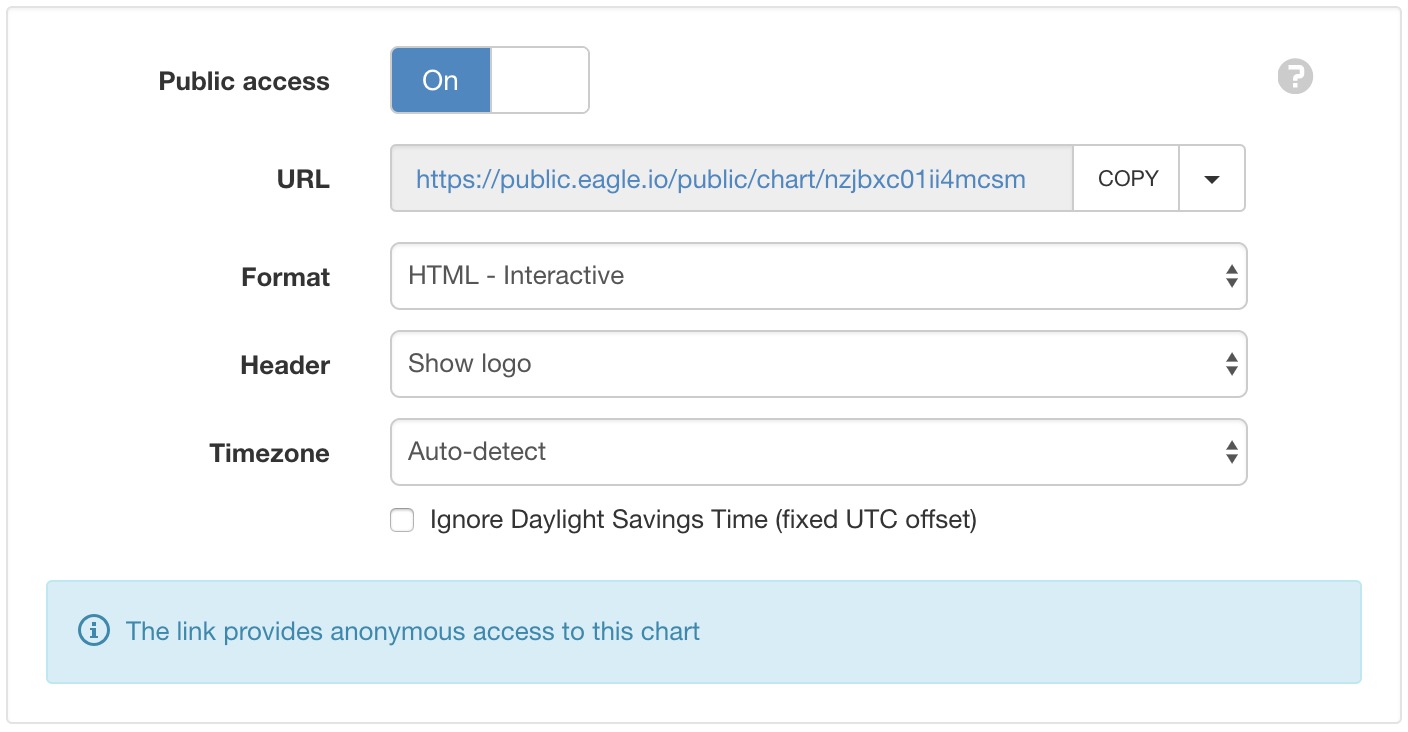
Public access
Enabling public access allows anyone to view the node (attachment, chart, dash, report or historic data) using the generated URL.
You can also embed charts and dashboards into your own website with basic HTML. Select Copy embed HTML from the URL dropdown menu for a generic code snippet (you will need to paste this in to your website). You can also revoke and replace the automatically assigned URL by selecting the Generate new URL option in the menu.
Use the available options to customize the URL based on your display preferences. These options are transient and you can use multiple variations of the URL at the same time.
Note
This feature is not included in Starter accounts.