Data Source (file)
 Data Sources automatically acquire or receive timeseries data using a variety of different transport options. Connect to a data logger or collect data from files. Data Sources can be created inside Locations only.
The type of Data Source (data logger or file) is selected at time of creation and cannot be changed. This section is specific to file Data Sources.
Note
Eagle.io supports the acquisition and storage of up to 20000 records per Data Source per day. Exceeding this limit will trigger an Overload Alarm on the Source. Refer to Historic Data Limits for more information.
Properties
 Configure properties via the Workspaces Tree context menu or List View properties icon. Requires configure permission.
General
The general section allows you to specify the type file(s) you would like to collect.
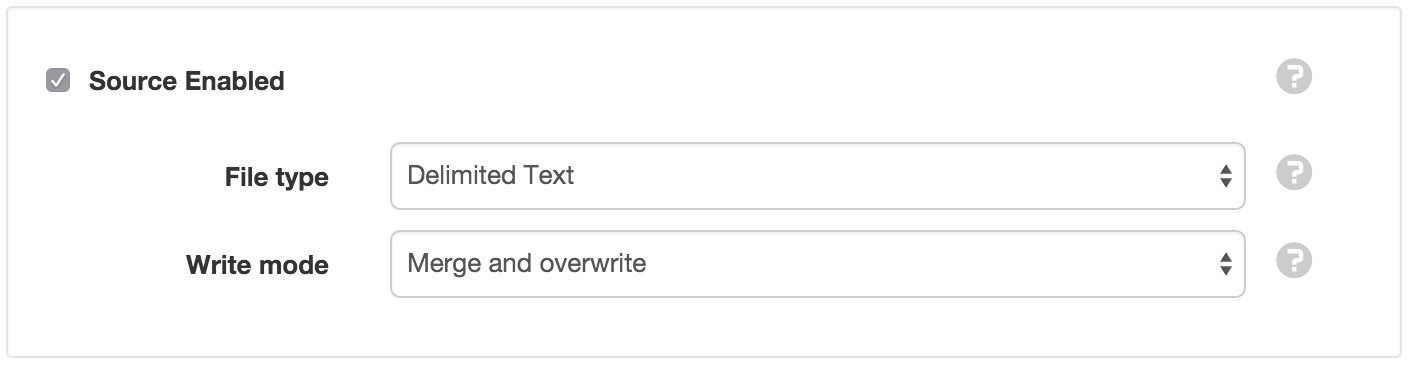
- Source Enabled
- Uncheck the Source Enabled checkbox to stop collection and prevent alarms and notifications from triggering.
- File type
Select the type of file(s) you would like to collect. The file type must be selected during datasource creation and can not be changed.
Delimited Text
Data is transmitted as rows of values separated with a specific delimiter character.JSON Time Series
Data is transmitted in the JSON Time Series format. Note: JTS files to be acquired must contain a columns header that specifies name and dataType of each column included in the data.Custom Format
Data is transmitted as binary or text data (in any format) and transformed by a Converter into JSON Time Series format. A Converter can be constructed and submitted for approval via the Converter repository. Once accepted, your custom format will appear in the File type list. Note: the eagle.io team can assist with developing a Converter for your custom format.- Write mode
Select how acquired data will be written:
Merge and overwrite will insert the acquired data into the existing historic data and overwrite the existing values when timestamps match.
Merge and preserve will merge the acquired data into the existing historic data and will not overwrite existing values when timestamps match.
Replace existing will remove all existing historic data within the range of data being acquired.
Connection
Configure how you would like to connect to your file(s).
- Transport type
- Select the transport used to acquire files:
None
Select this option when data will arrive exclusively via the HTTP API or manually imported.
Download from FTP site
Connect to an external FTP Server to acquire data files. Note: FTP is supported in passive mode only.
- FTP host
- Host name or IP address of the FTP Server.
- Port
- TCP Port to use for connection to the FTP Server. Default Port 21 for standard FTP/FTPS or 990 for FTP with Implicit SSL.
- Mode
- FTP Secure connection options. Use FTP for standard connection or choose an available FTPS mode. Consult your network administrator to verify the settings required for connection to your FTP Server.
- Remote path
- Specifiy the base remote path on the FTP Server that you have accesss to. You can retrieve files from sub-directories within this path.
- User
- Specifiy the name of the user account for the system to use when connecting to the FTP Server. Enter anonymous if no user account is required.
- Password
- Password for the associated user account (or leave blank for none).
Download via HTTP
No configuration required.
The File URL (when adding file) must start with http:// or https://. Optionally specify the login username and password as part of the URL if HTTP Basic authentication is required. eg. http://user:password@company.com/file.csv.
Parts of the URL can be dynamically generated by including JavaScript expressions surrounded by double braces (
{{ expr }}).Processing & Logic Global Variables can be referenced, along with the
T( expr )function for time manipulation.An example URL with expressions to request the most recently acquired data through till the most recently available:
http://data.com/?start={{T(SOURCE.currentLocalTime).format('YYYY.MM.DD')}}&end={{T(NOW).format('YYYY.MM.DD')}}Outputs a URL similar to
http://data.com/?start=2015.01.01&end=2017.12.01
Upload via HTTP
Data can be submitted as an HTTP POST body to the automatically generated URL. Password is optional.
- IP whitelist
- You can optionally restrict incoming connections to this source to a list of approved IP addresses specified using CIDR notation. eg. 192.168.7.52/32 Leave empty for no IP address restrictions.
Note: Please consider using the API for more options uploading via HTTP.
Email to eagle.io
Email data using the auto-generated email address exactly as shown.
- Sender address filter
- For added security you can filter by sender email address. Restrict to a specific email address or to a specific domain. eg. user@company.com or @company.com. Leave blank for no restriction.
Note: The maximum accepted size per email (including all data files) is 25MB.
Send SMS text message
Send a text message to one of our incoming SMS phone numbers:
- Australia:
- +61 488 811 086
- United States:
- +1 408 400 3928
- Custom phone numbers:
- Please contact us to arrange a custom incoming SMS number to be exclusively associated with your account. This will allow you to choose your own Source Id.
- SMS messages must contain exactly 2 lines with the following content:
- Source Id
- Data payload
Publish to mqtt.eagle.io
Publish data with MQTT using the following settings:
- Broker address
- mqtt.eagle.io
- Broker port
- Use port 1883 for standard connection or port 8883 for SSL.
- Topic
- Use the auto-generated topic exactly as shown. eg. io/eagle/source/fruit-honey-jacket
- MQTT Password
- Optional password (leave blank for none).
- IP whitelist
- You can optionally restrict incoming connections to this source to a list of approved IP addresses specified using CIDR notation. eg. 192.168.7.52/32 Leave empty for no IP address restrictions.
Note: The maximum accepted size per mqtt message is 10MB.
Read from Amazon S3
Connect to an Amazon S3 bucket to acquire data files.
- Bucket
- Unique S3 bucket name. eg. my.aws.bucket
- Access key Id
- User access key Id (generated from AWS Console).
- Secret
- Secret token associated with access key.
Note: Matching files will be removed from S3 after acquire.
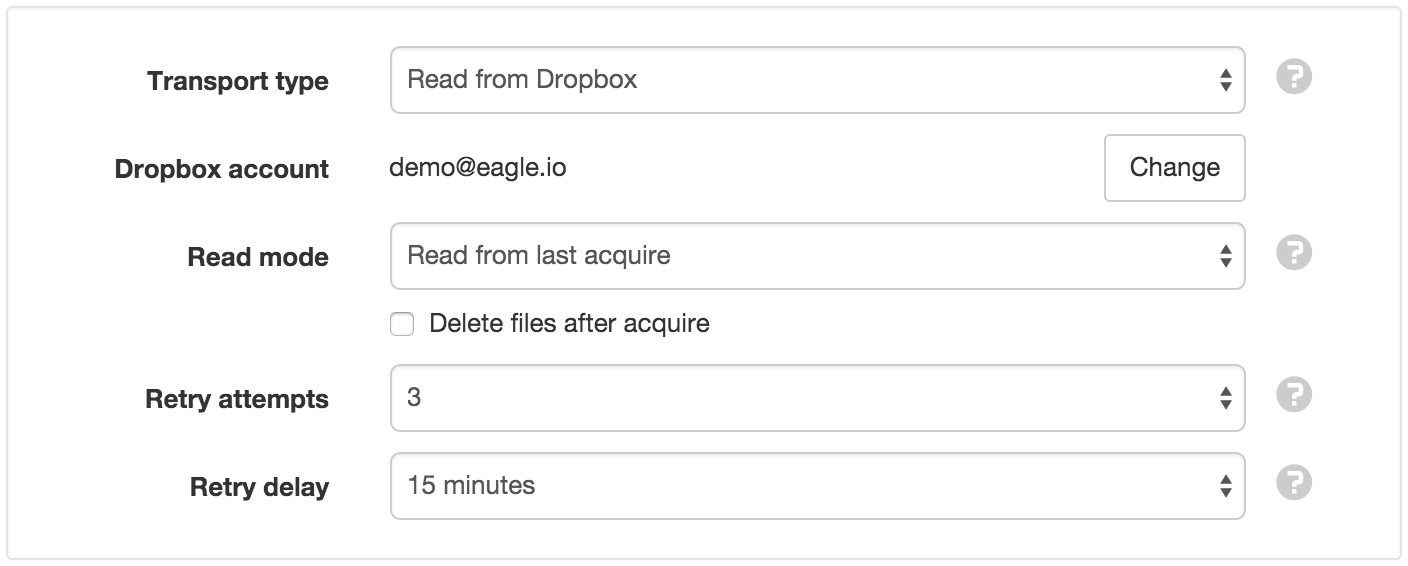
Read from Dropbox
Dropbox is used to connect to a Dropbox account. An eagle.io folder will be created in your Dropbox Apps directory where you can place files for collection.
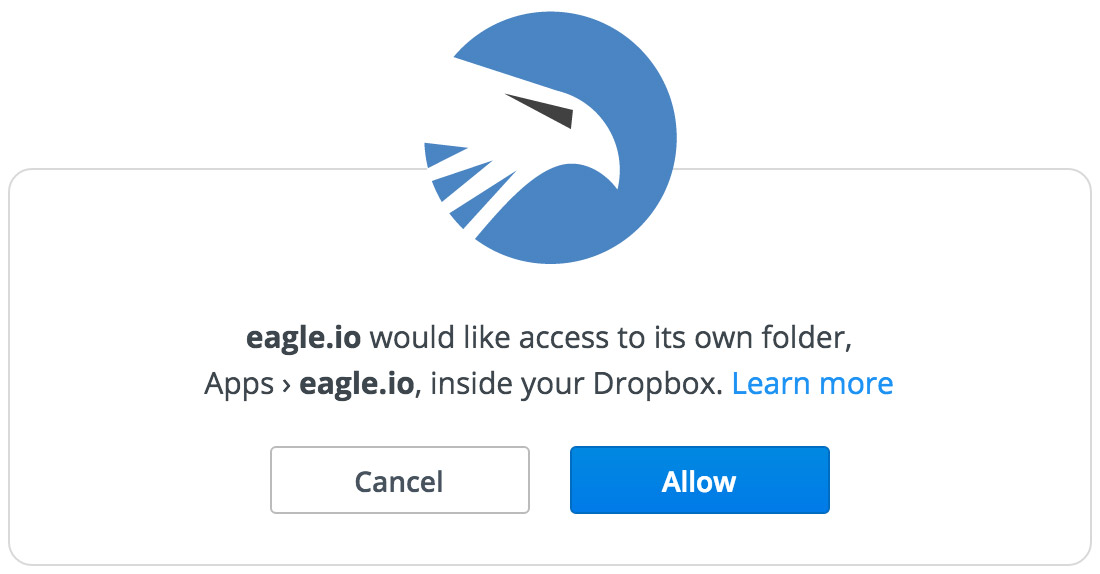
When changing the account, a popup window will be displayed which allows you to login to Dropbox and authorise access as shown above.
Upload to ftp.eagle.io
FTP your files to ftp.eagle.io using the auto-generated user name exactly as shown. Password is optional. Use Tcp port 21 for standard Ftp and Tcp port 990 for Implicit SSL.
- IP whitelist
- You can optionally restrict incoming connections to this source to a list of approved IP addresses specified using CIDR notation. eg. 192.168.7.52/32 Leave empty for no IP address restrictions.
Note: Only one concurrent ftp connection is allowed per Source. The maximum accepted size per file is 100MB.
Upload to sftp.eagle.io
SFTP your files to sftp.eagle.io using the auto-generated user name exactly as shown. Password is optional. Use Tcp port 22.
- IP whitelist
- You can optionally restrict incoming connections to this source to a list of approved IP addresses specified using CIDR notation. eg. 192.168.7.52/32 Leave empty for no IP address restrictions.
Note: Only one concurrent sftp connection is allowed per Source. The maximum accepted size per file is 100MB.
- Read mode
Select how data should be read from the file:
Read all records will read in the entire file on each acquisition.
Read new records will only read new data added to the file since last acquisition.
Optionally delete files after acquire (not supported on all transports).
- Retry attempts
- Select how many retry attempts are made during an acquisition or scheduled collection before the communications is considered failed.
- Retry delay
- Select the delay between retry attempts. The retry attempts multiplied by the retry delay should not exceed the collection interval.
- Communications Alarm
- See Alarms and Notifications.
Collection
Collection is used to specify if and when data should be automatically collected from the Source.
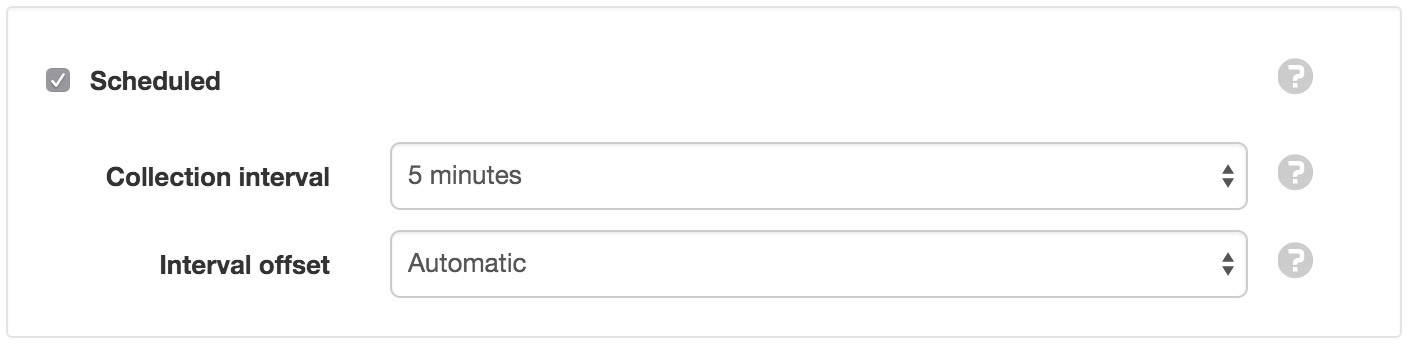
- Scheduled
- Enable the schedule for automatic data collection.
- Collection interval
- Select the frequency of the collection.
- Interval offset
- Offset the collection interval to prevent collection occuring on the interval. eg. 1 hour collection interval will occur at 9am, 10am, etc. Set an interval offset of 5 minutes and the collection times will be 9:05am, 10:05am, etc.
- Outdated Alarm
- See Alarms and Notifications.
- Overload Alarm
- See Alarms and Notifications.
Series
The Series section allows you to assign Series from the Source to New or Existing Parameters.
- Add Files
- Add new files to be acquired by the Source (10 files maximum). A list of files will be displayed which are available using the current connection options. Select the new files to be added. You will need to setup the parser configuration for each file added.
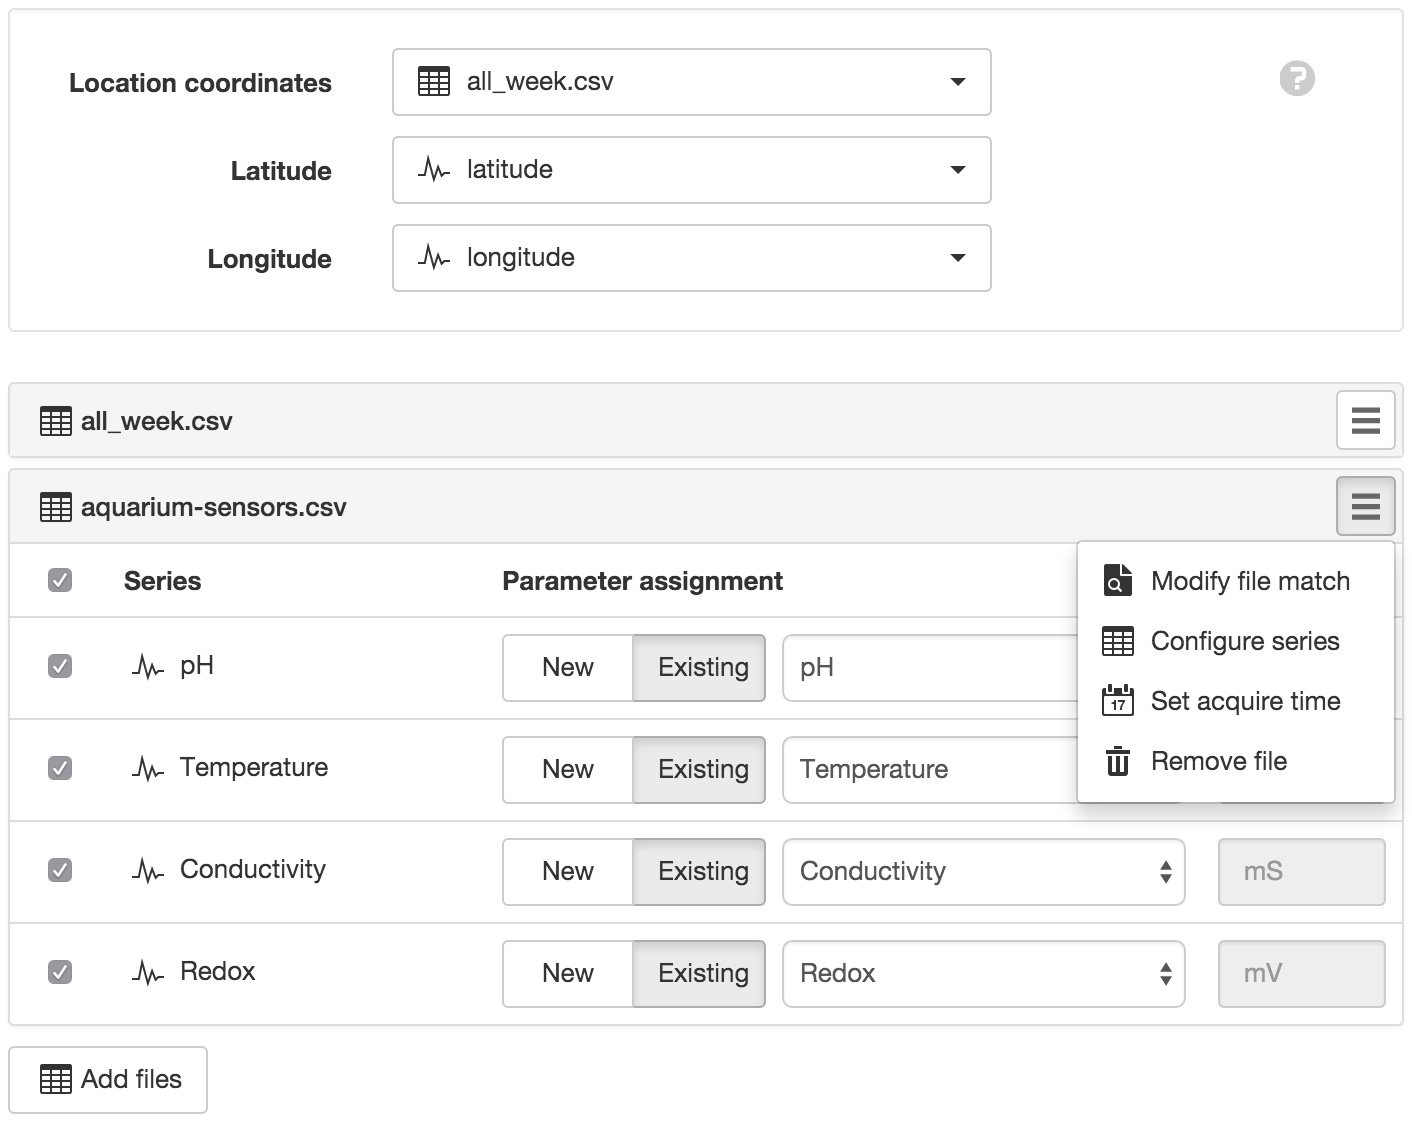
- Location Coordinates
- The Source can optionally provide Location Coordinates from a coordinate series or a pair of numeric series (lat/lng). You need to configure the Location and select this Source to be used for its coordinates. Select the file and series to use from the drop down list.
- Modify file match
 Modify the file configuration and matching criteria and select a sample file to use for configuring series.
Some transport types such as Email or FTP/SFTP Server require you to upload a local sample file or alternatively Skip or Reset sample file and retrieve on next acquisition. The file name match should uniquely match the name of uploaded file(s). For example use .csv to match all files with a csv extension (case-insensitive). Enable the Match using regular expression option for advanced matching.
Modify the file configuration and matching criteria and select a sample file to use for configuring series.
Some transport types such as Email or FTP/SFTP Server require you to upload a local sample file or alternatively Skip or Reset sample file and retrieve on next acquisition. The file name match should uniquely match the name of uploaded file(s). For example use .csv to match all files with a csv extension (case-insensitive). Enable the Match using regular expression option for advanced matching.- Configure series
 Setup or Update the parser configuration for the selected file. See Text Parser Configuration for full details. If a sample data file has not been uploaded or acquired the Configure series menu item will be disabled.
- Set acquire time
 Set or reset the collection pointer for the corresponding table to re-collect its data from the specified date using the Write mode option selected in the General tab.
- Remove file
 Select this option from the drop down table menu to remove this file from the Source. All parameters associated with the series from the file will be disabled.
- Parameter Assignment
You must assign Series to New or Existing parameters and set the Series for collection by ensuring its checkbox is enabled. Any Parameters assigned to Series will be disabled when the Series is unchecked for collection.
Parameters can be re-assigned to new Series at any time without loosing existing historic data.
The series icon indicates the type of parameter that will be created. Rename and Delete operations should be performed from the Workspaces Tree.
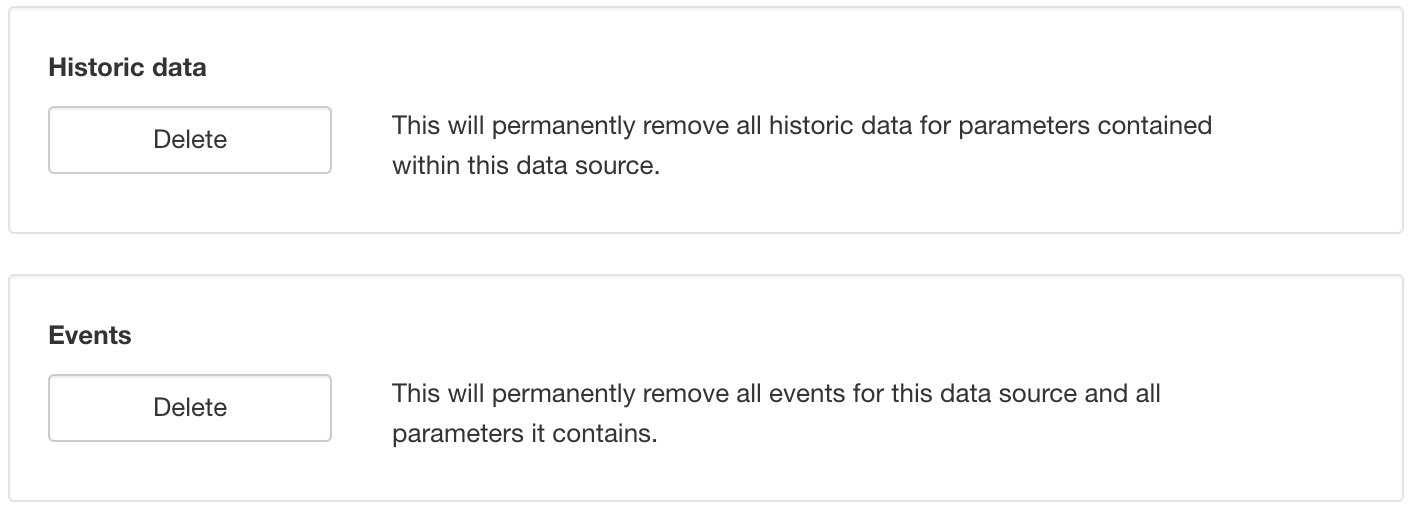
Historic
Click the Delete buttons and save to permanently remove all historic data or events for Parameters contained within this Data Source. Alternatively use the Parameter Historic section to delete historic data or events for individual Parameters.
Time
Time allows you to configure the timezone of the Source and associated options.

- Timezone
- Select the timezone the Source uses for storing historic data. Choose (GMT+00:00) UTC if data timestamps are in UTC.
- Ignore Daylight Savings Time
- Check this option if the Source does not offset the data timestamps to account for DST.
Security
The Security section displays a list of all users and groups that have access to the Node. Users with security permission can restrict user and group access to the node and its descendants by assign the No Access role.
New users and groups must be added via the Workspace Security section.
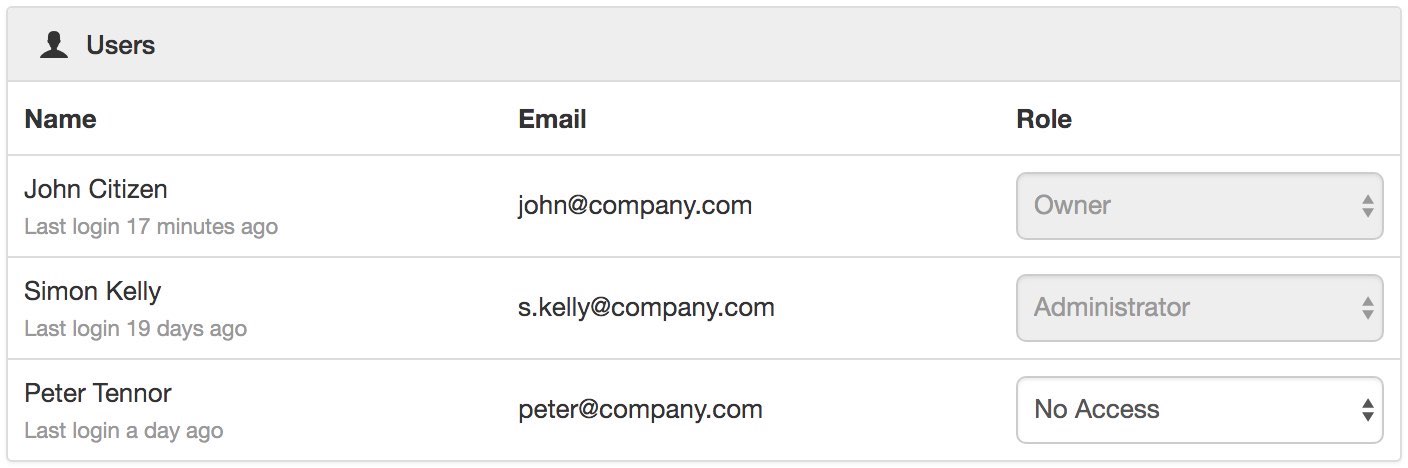

Note
The Account Owner, Administrators or Workspace users/groups that have been assigned a Workspace role with the configure permission can not be assigned the No Access role.
Text Parser Configuration
The Text Parser allows you to define how a delimited text file should be processed by the system including defining series to be assigned to Parameters. All scheduled collection and user acquisition requests will use the saved parser configuration to process any new data that has been appended to the file since last collection.
General Settings
General settings are used to specify file format and encoding options.

- Column delimiter
- Specify the delimiter used to separate values in each line of the file. Select a delimiter from the drop down or enter a custom character to use.
- Format
- Select the record format of the file. Column series should be used when each column in the file represents a single series or sensor. Row series should be used when each row (line) in the file represents a single series or sensor.
- Labels row
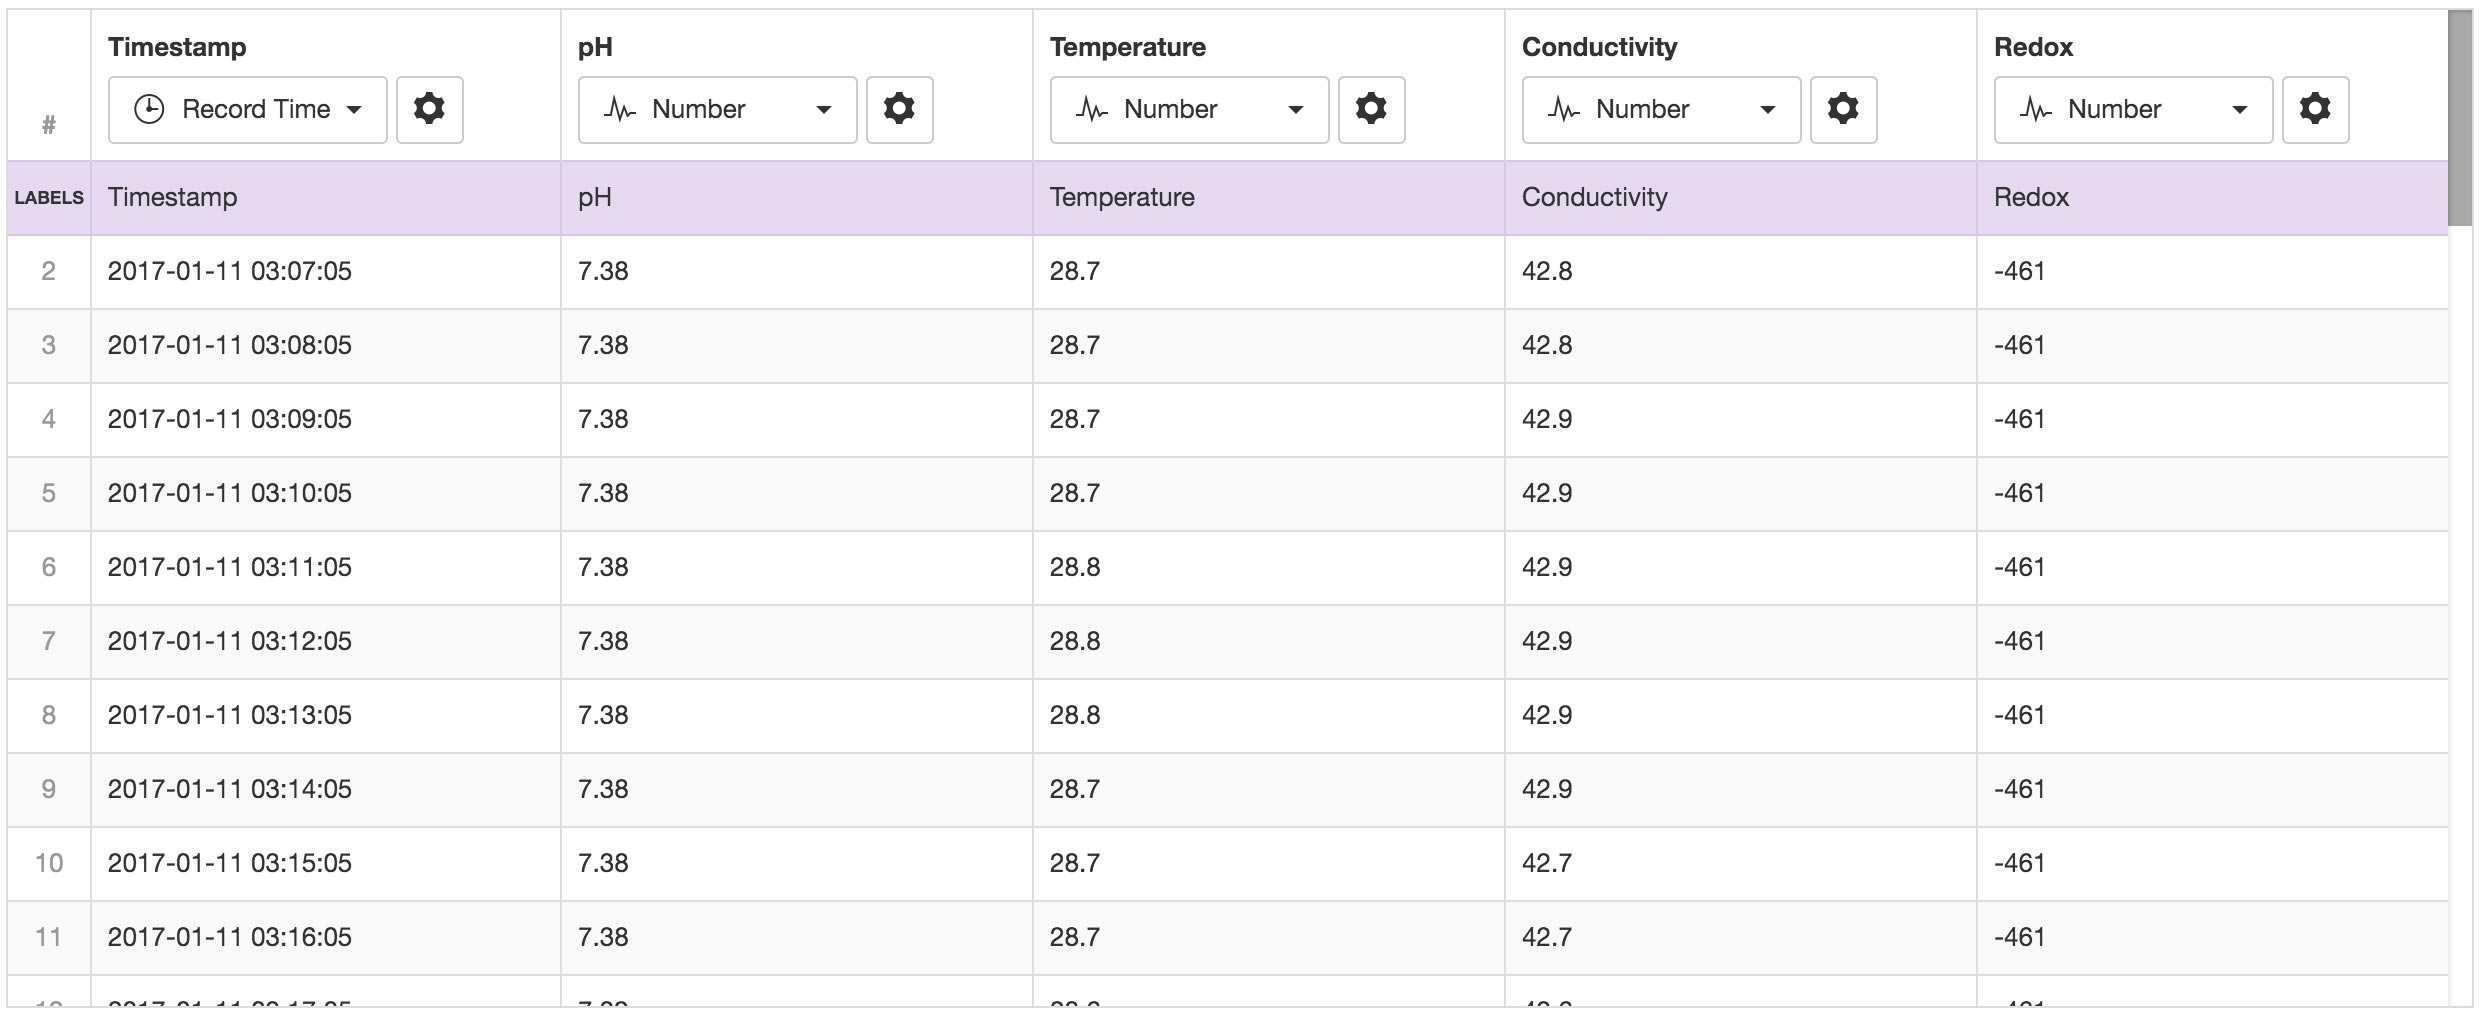
- If your file contains a labels header row you can specify the corresponding line number or click the row number in the Parser Preview. The corresponding row will be highlighted and the column values will be used as the column labels. Labels are shown for convenience, but you can assign any valid names to the parameters during or after creation.
- Units row
- If your file contains a units header row (and your using Column series format) you can specify the corresponding line number or right-click the row number in the Parser Preview. The corresponding row will be highlighted and the associated column values will be used as the default units. You can change the units during or after parameter creation.
- Text qualifier
- Specify the character used to surround text values. This character will be automatically stripped if it exists in a column. Select a qualifier from the drop down or enter a custom character to use.
- Text encoding
- The encoding format of the text file. If you notice special characters displayed incorrectly in the Parser Preview, you may need to change this setting.
- Match
- Smart match will intelligently extract any values from the field that matches the column data type. Strict will only extract a value from the field if the entire field contents matches the column data type.
- Success required
- When parsing a file via its configured transport, a Data alarm will be raised on the Source (when enabled) if the number of records successfully parsed do not reach this percentage threshold. Defaults to None (0%). ie. do not raise any alarm.
- Reset to defaults
- Resets parser configuration and joins to system defaults.
File Contents
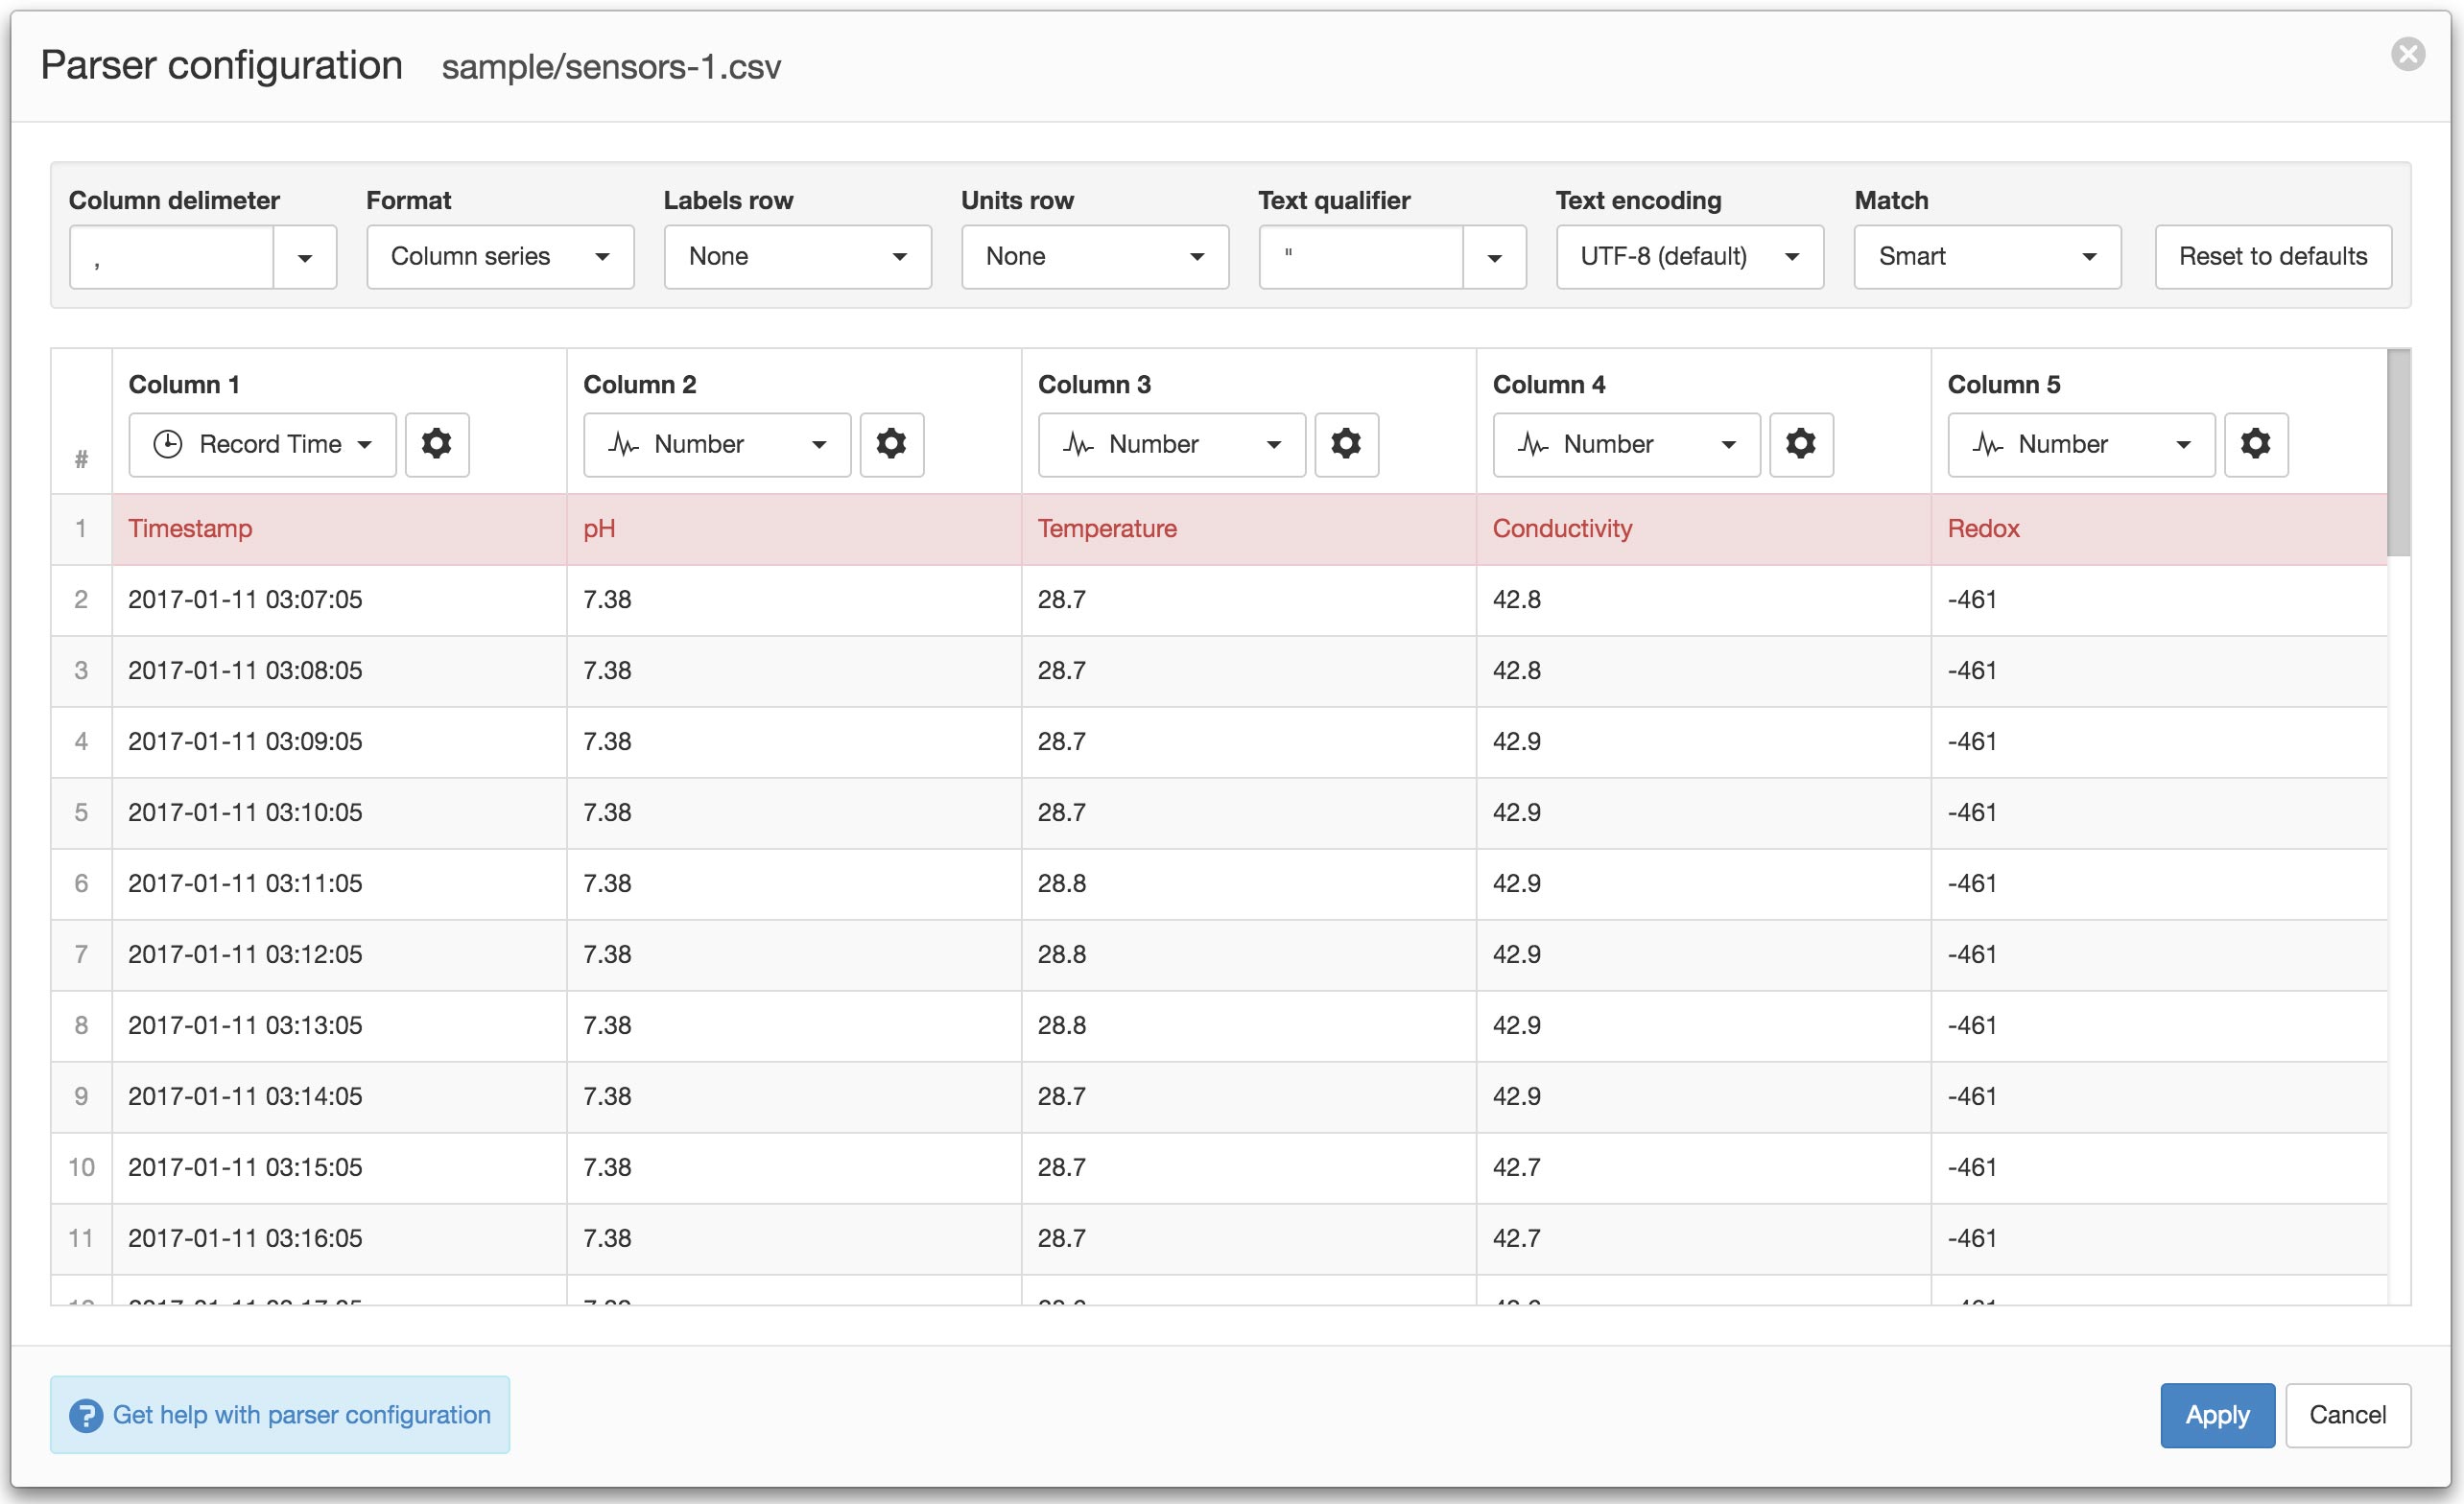
The Parser extracts a sample from the beginning of the input text file and attempts to split the file into columns based on the current Column delimiter and Format.
Column Series Format
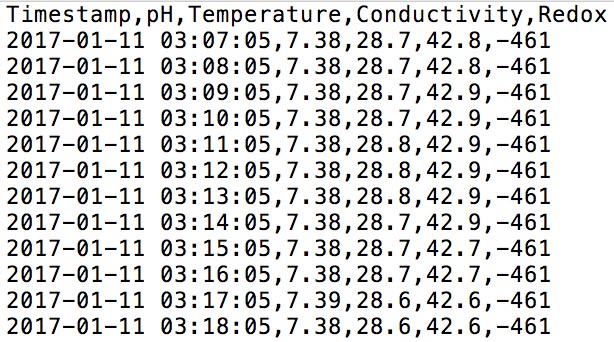
This format should be used when each column represents a single series or sensor. Every row is considered a record and must contain a timestamp.
Input Text File
Parser Preview
Row Series Format
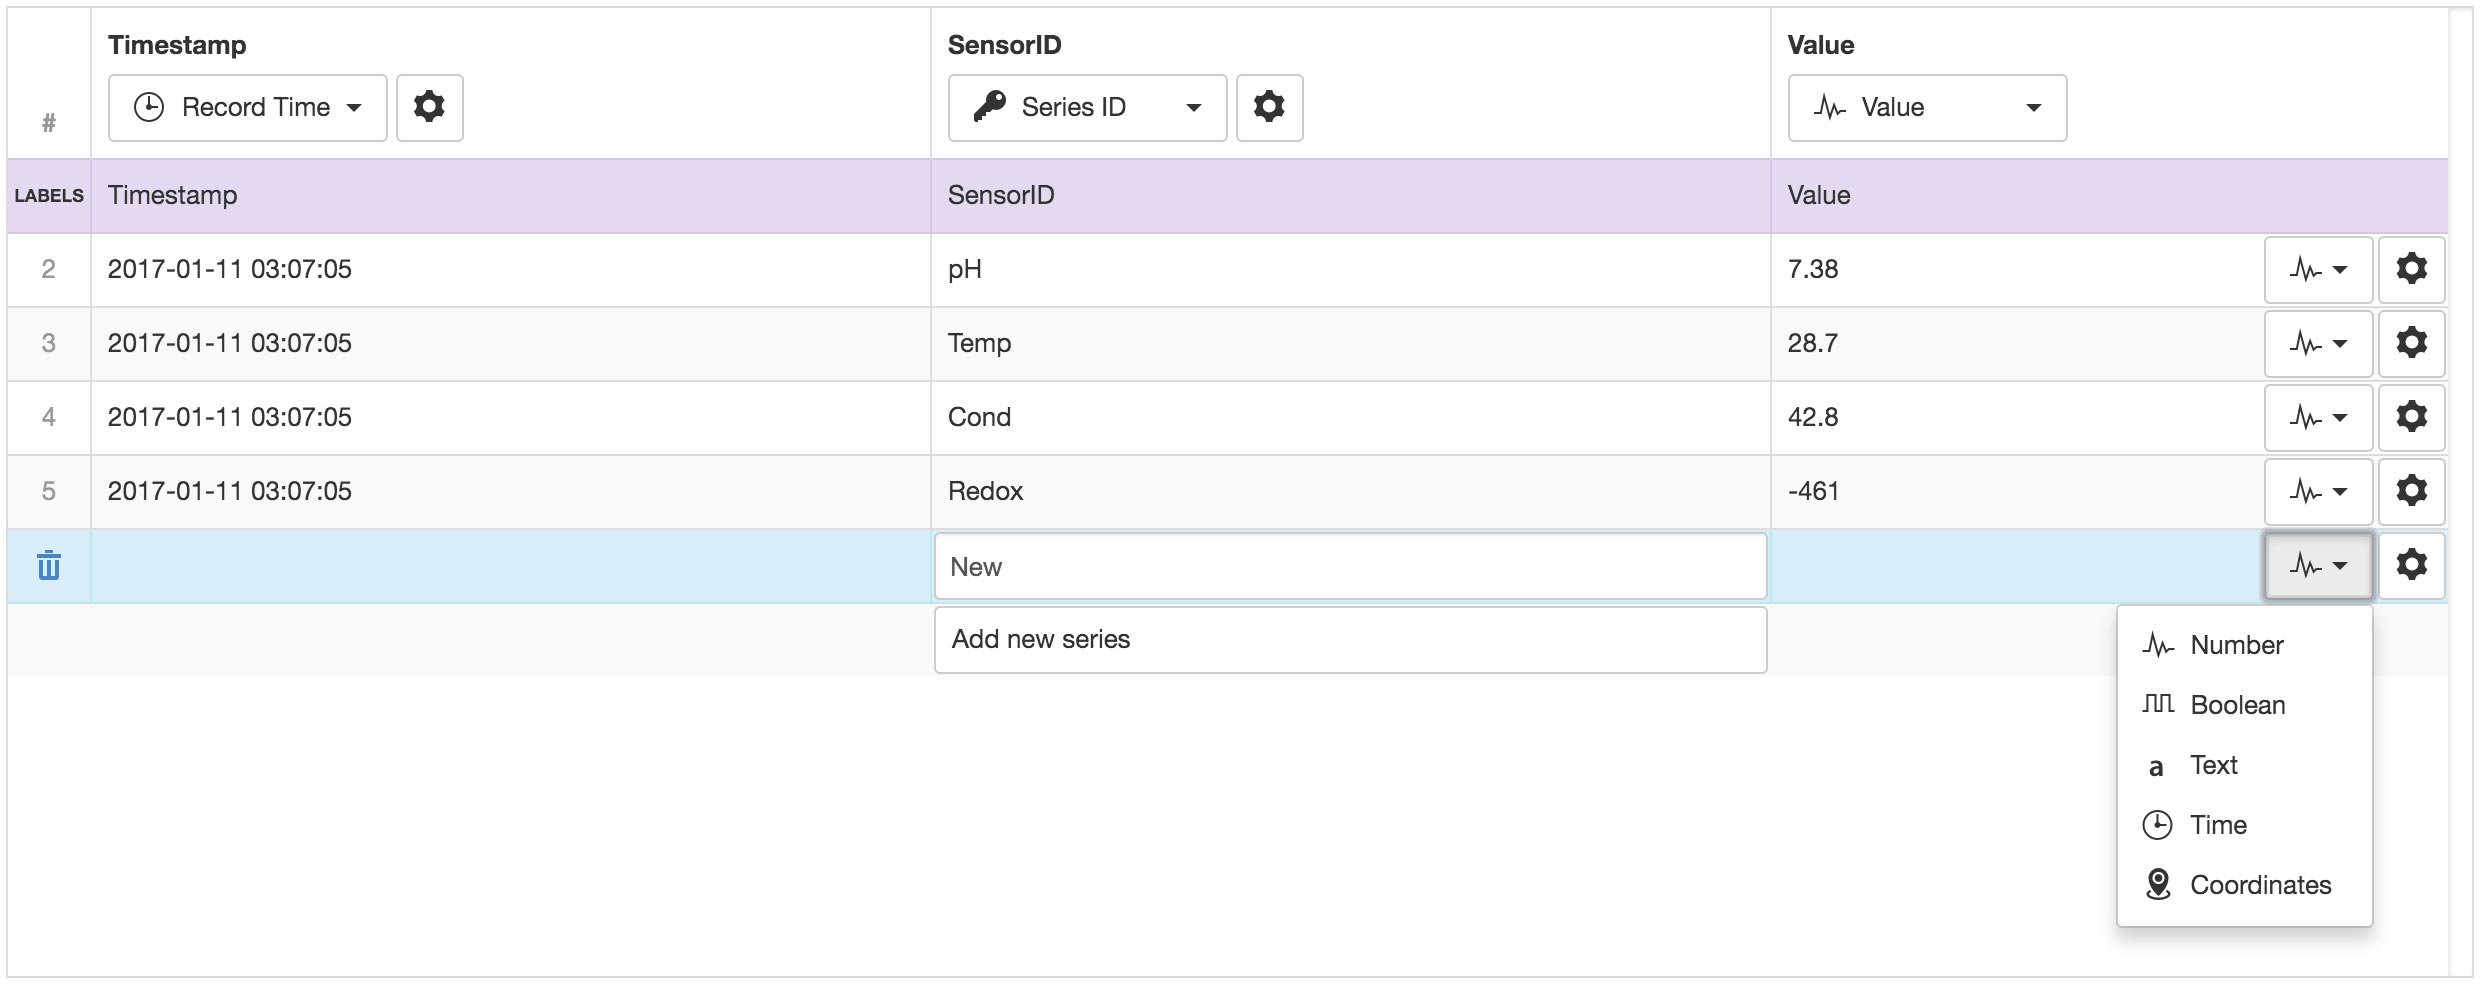
This format should be used when each row (line in file) represents a single series or sensor. Every row must contain a timestamp, unique identifier for the sensor (Series ID) and a value. The parser preview will only display rows with unique Series ID’s. The sample input file may not contain all the possible Series ID’s, so you can click the Add new series button and enter additional Series ID’s as required. Ensure the correct data type is set for all series.
Input Text File
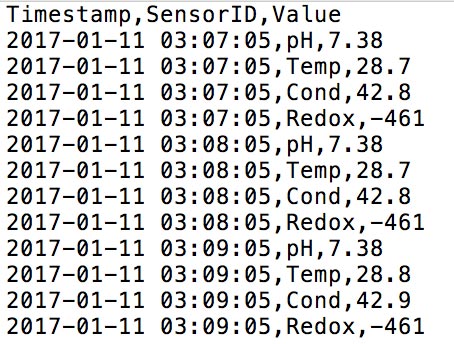
Parser Preview
Columns and Data Type Selection
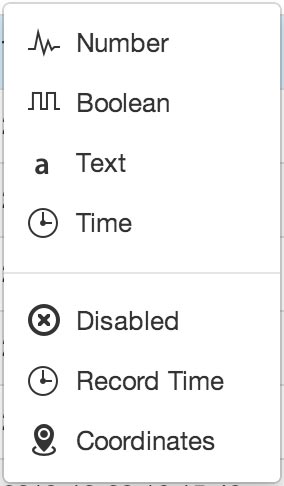
In Column Series format, columns are assigned a series data type which determines how they should be processed and the type of Parameter that will be available for creation.
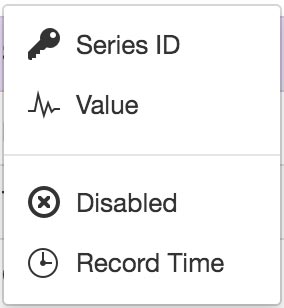
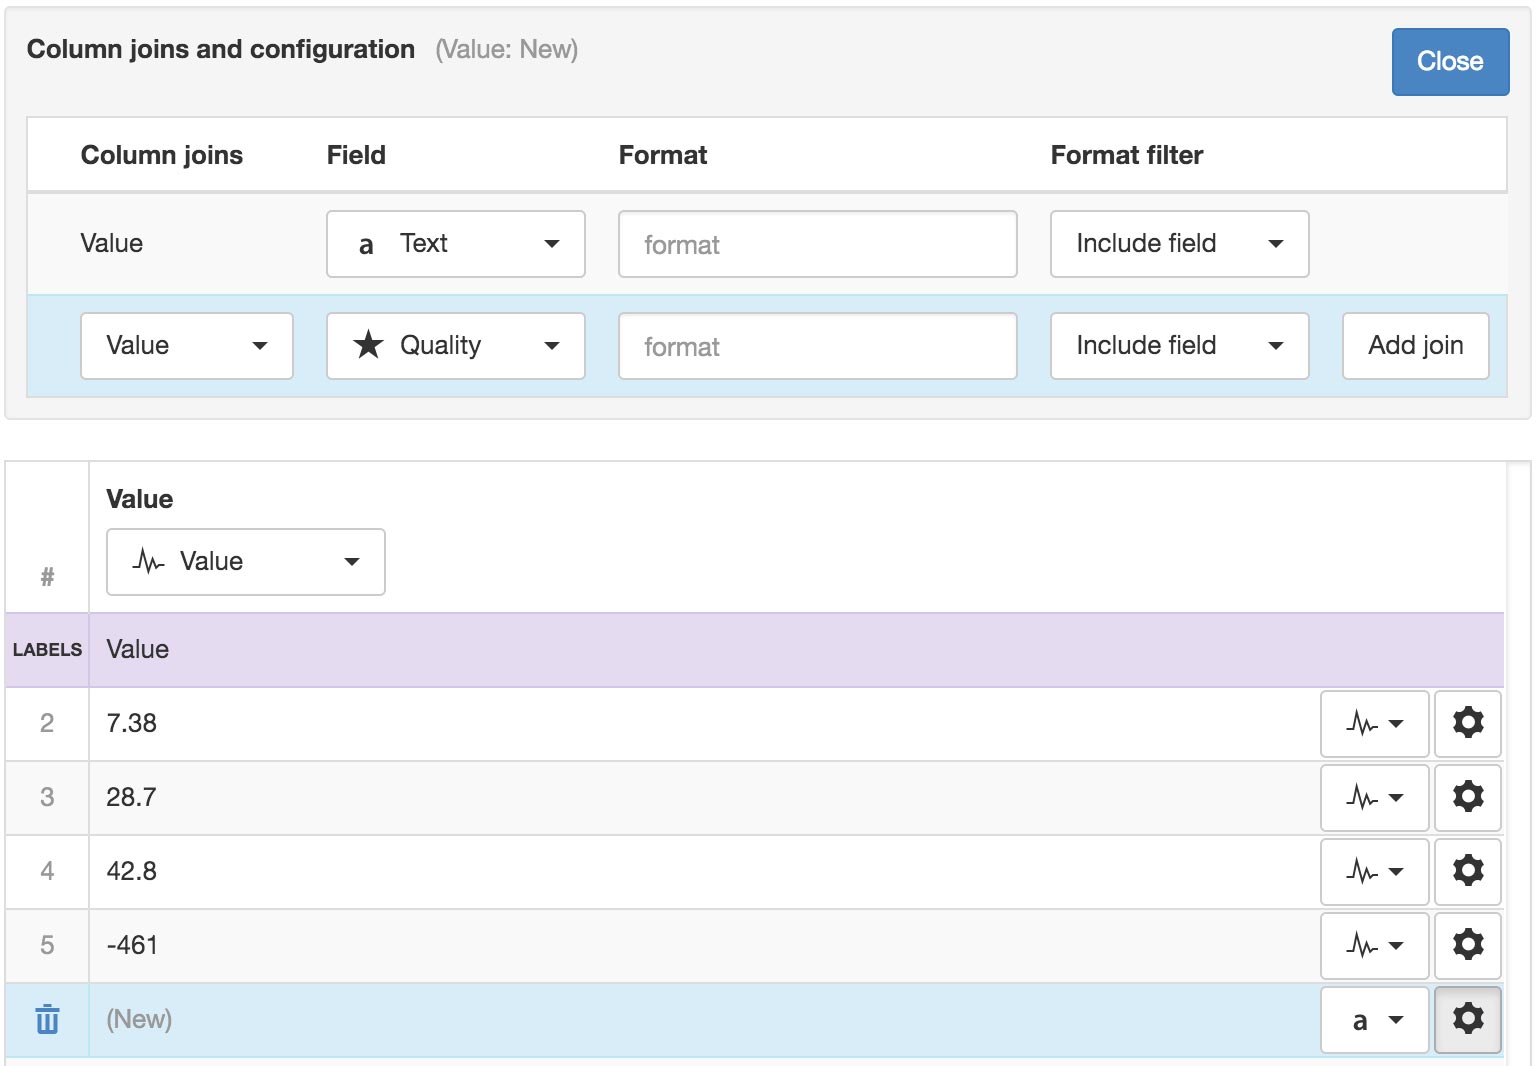
In Row Series format, columns are assigned as Record Time, Series ID, Value or Disabled. The column that is assigned as the Value column has individual data types assigned per row.
Use the data type drop down menu in the column/row to select a data type from the available options. Individual cells that do not match the selected series data type are displayed in RED. Hover over a cell in the Parser Preview to display a tooltip (where valid) showing how the raw data will be interpreted by the parser.
Series Data Types
- Number
- Interpret data as numeric. Can be created as a Number Parameter and suitable for both analog and digital data.
- Boolean
- Interpret data as Boolean only. Can be created as a special Number Parameter with predefined states and accepts boolean data as text (TRUE or FALSE) or numberic (0 or 1).
- Text
- Interpret data as Text. Create a Text Parameter from the column.
- Time
- Interpret data as Time. You need to specify the time format using the Joins and Parser Configuration section. You can create a Time Parameter from the column.
- Disabled
- The column will be GREY in the Parser Preview and will not be available for Parameter creation. Setting an unused column to Disabled is optional. It has been added for convenience when working with files with lots of columns.
- Record Time
- The column to use as the Record Time (timestamp for the line values). There must always be exactly one Record Time column defined. You need to specify the time format using the Joins and Parser Configuration section.
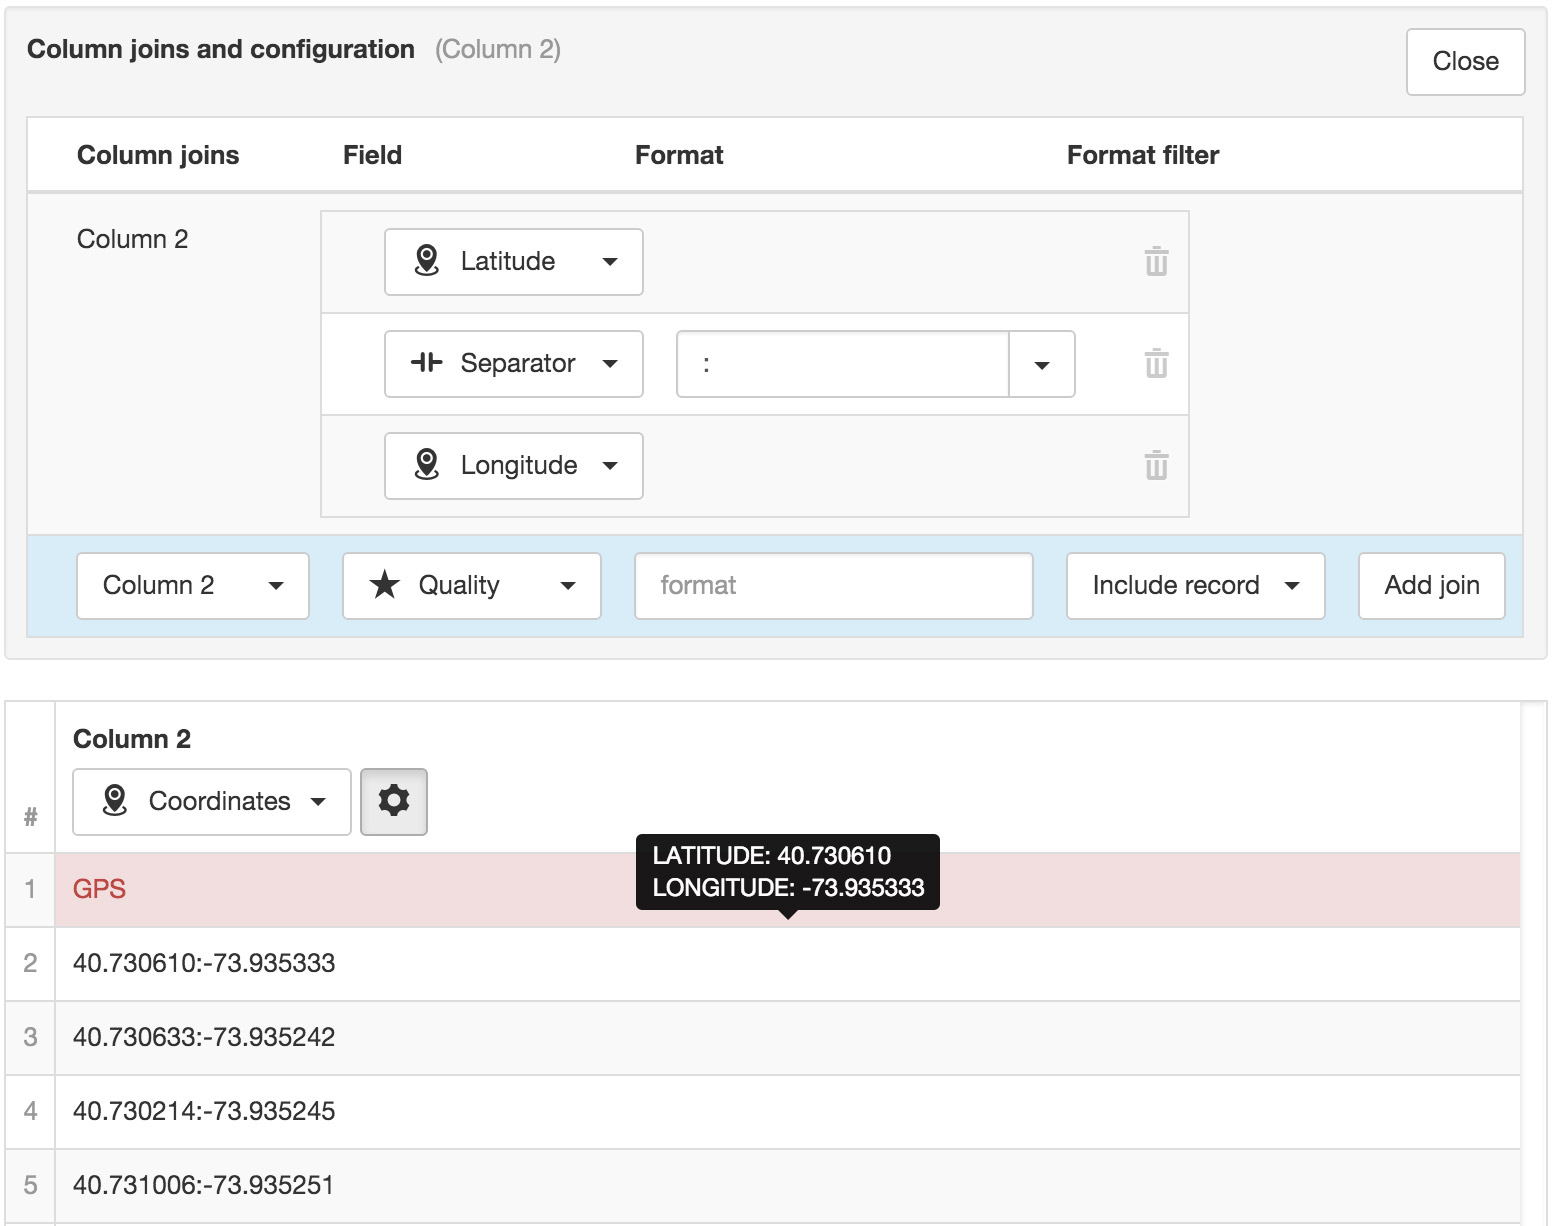
- Coordinates
- Interpret column data as Coordinates (Latitude and Longitude). You can only specify one Coordinates column per file (but you can join data from other columns). Use the Joins and Parser Configuration section to specify the Latitude and Longitude fields. If Coordinates (latitude and longitude) are split over multiple columns, you can also just set the data type of the columns as Number and select the individual columns when configuring the Location Coordinates for the Source.
Joins and Parser Configuration
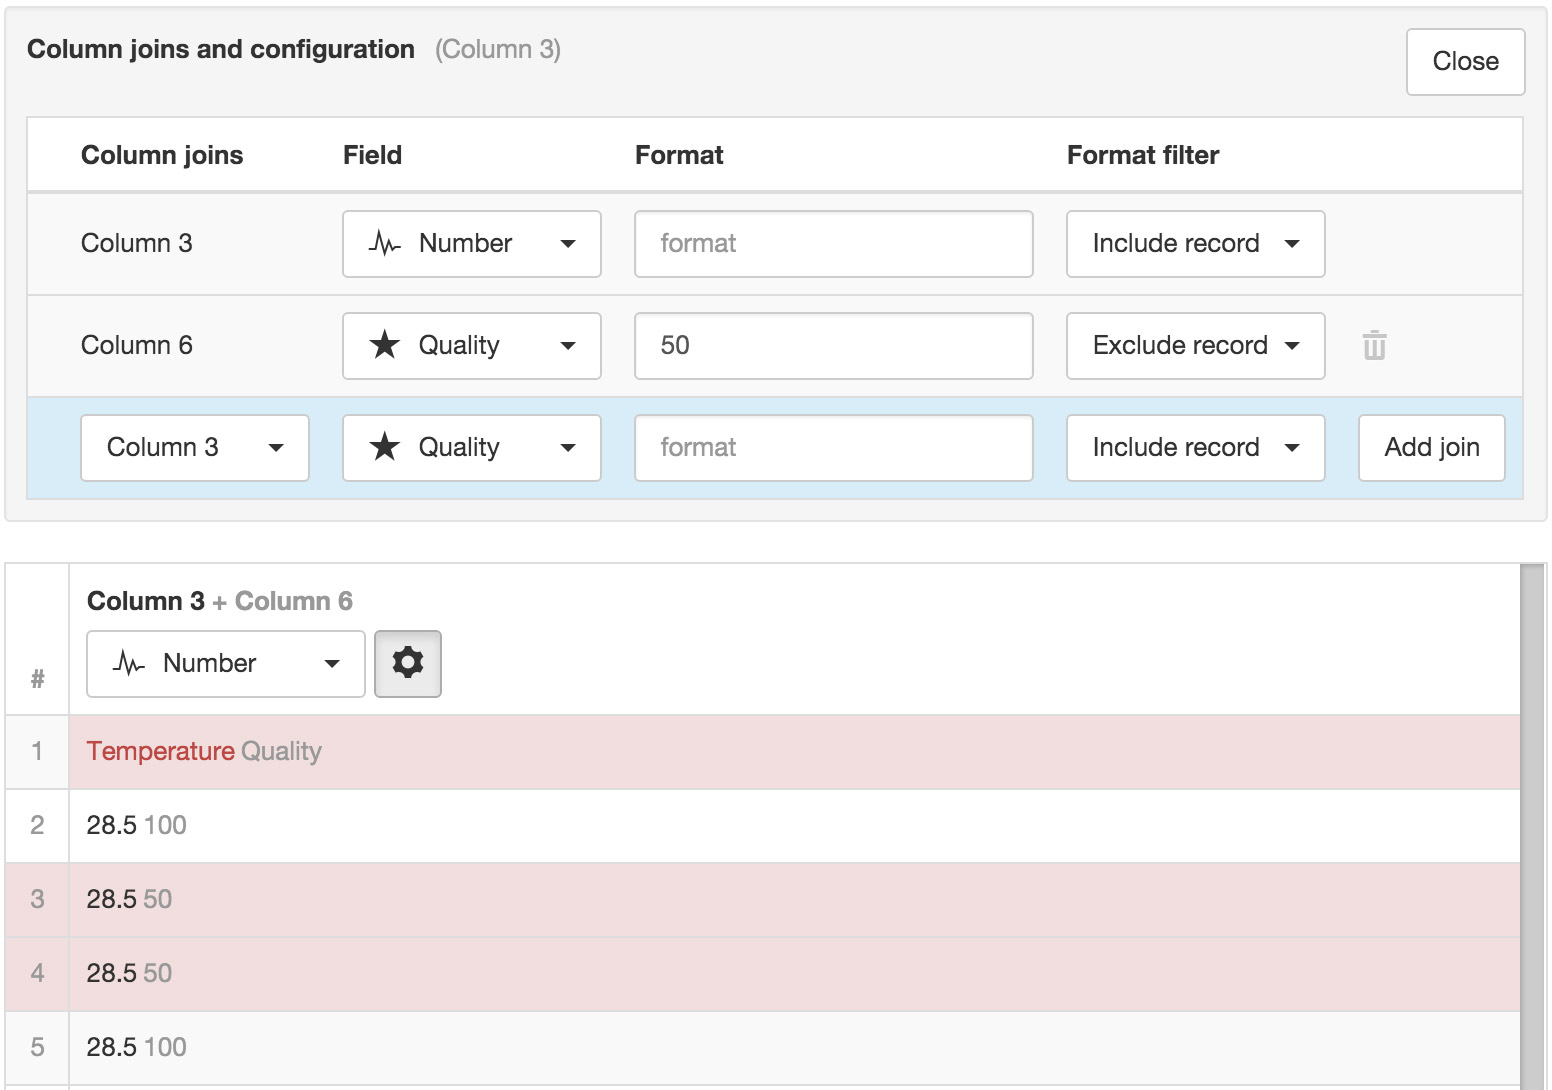
The Joins and Parser Configuration section (available from the properties icon at the top of each column or in each row of the Value column for Row Series format) is used to customize the parser for individual columns/series including joins, formatting and specifying quality.
Data values in input files are commonly split into separate fields and therefore will be shown as different columns in the Parser Preview. It is necessary to ensure each column you would like to use for Parameter creation has all joins/fields defined.
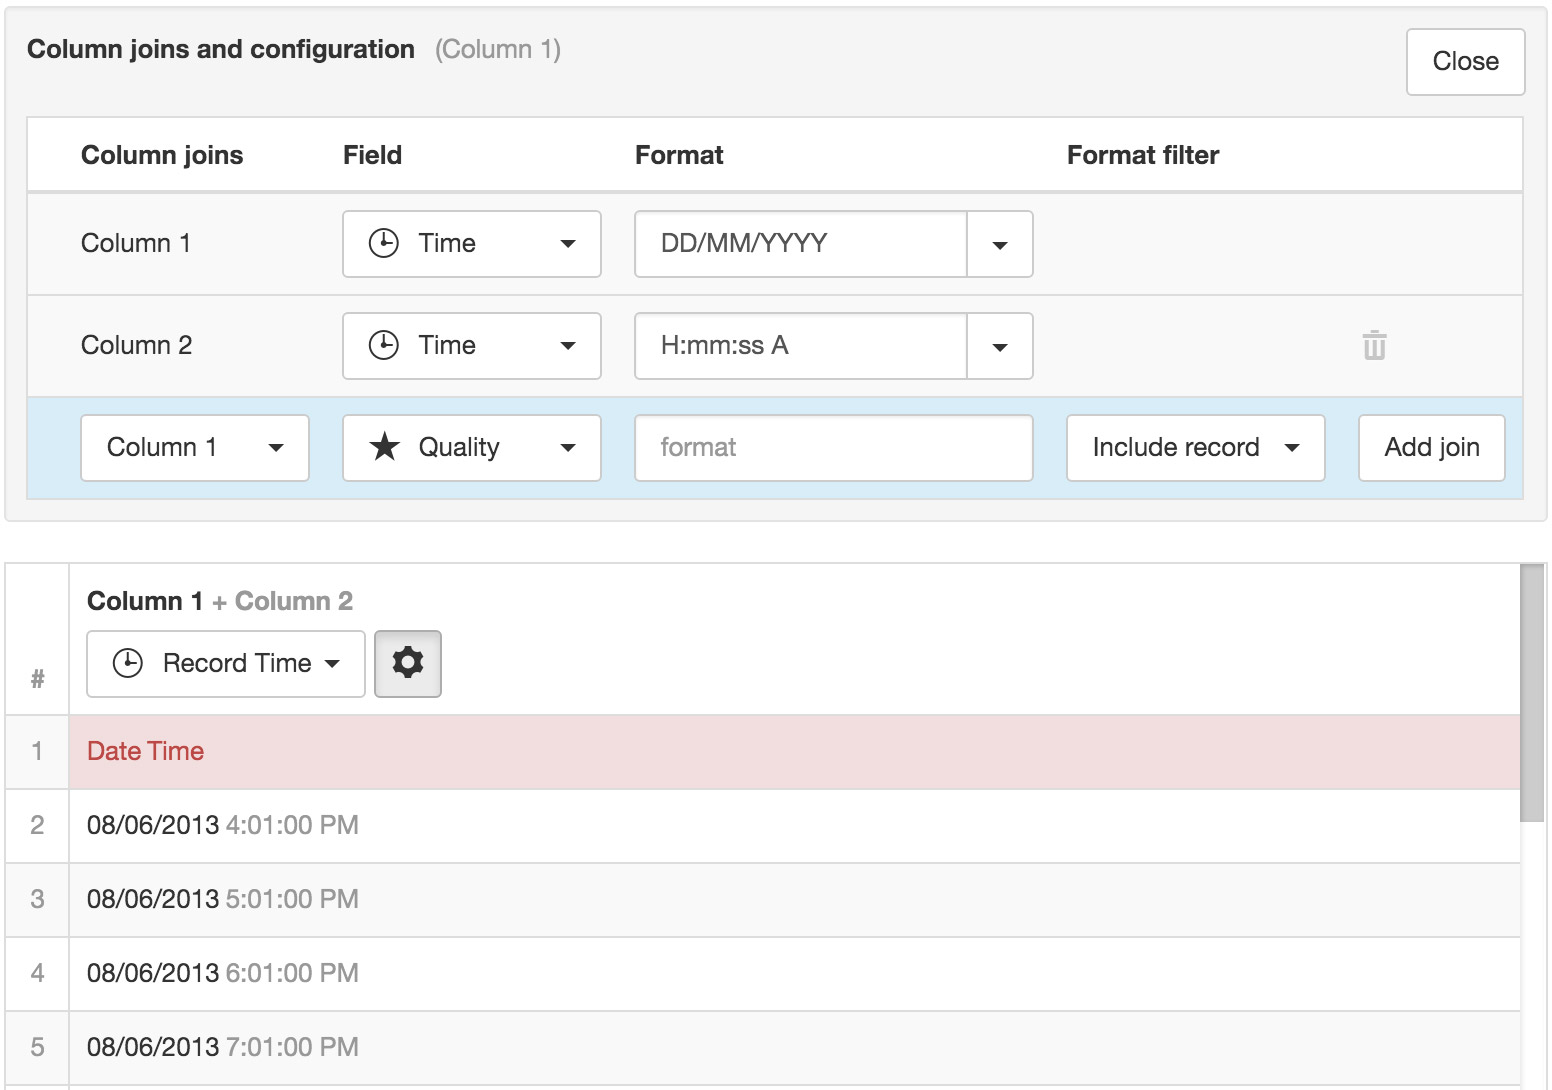
You can join additional columns via the Add join button. Select the column to join from the Joins drop down and the Field to be assigned. Columns are joined in the order they are displayed (top to bottom) and the result is shown in the Parser Preview.
Re-order any join/field by hovering over the item with a mouse to reveal the grab handle. Click and drag the grab handle to reposition the item in the list.

You may need to split or exclude data within a single column. Add a Separator field and exclude specific text (as specified in the Separator format field).
When using Row Series format, column joins and data type for the Value column must be configured per series. Use the dropdown data type selector and properties toggle button for each series/row.
Quality codes can be associated with each column, either by splitting the column or joining an additional column containing the quality codes.
All columns can be re-used as joins on other columns. For example you can have multiple parameter columns that all share the same quality code value by adding the quality code column as a join on each parameter column.
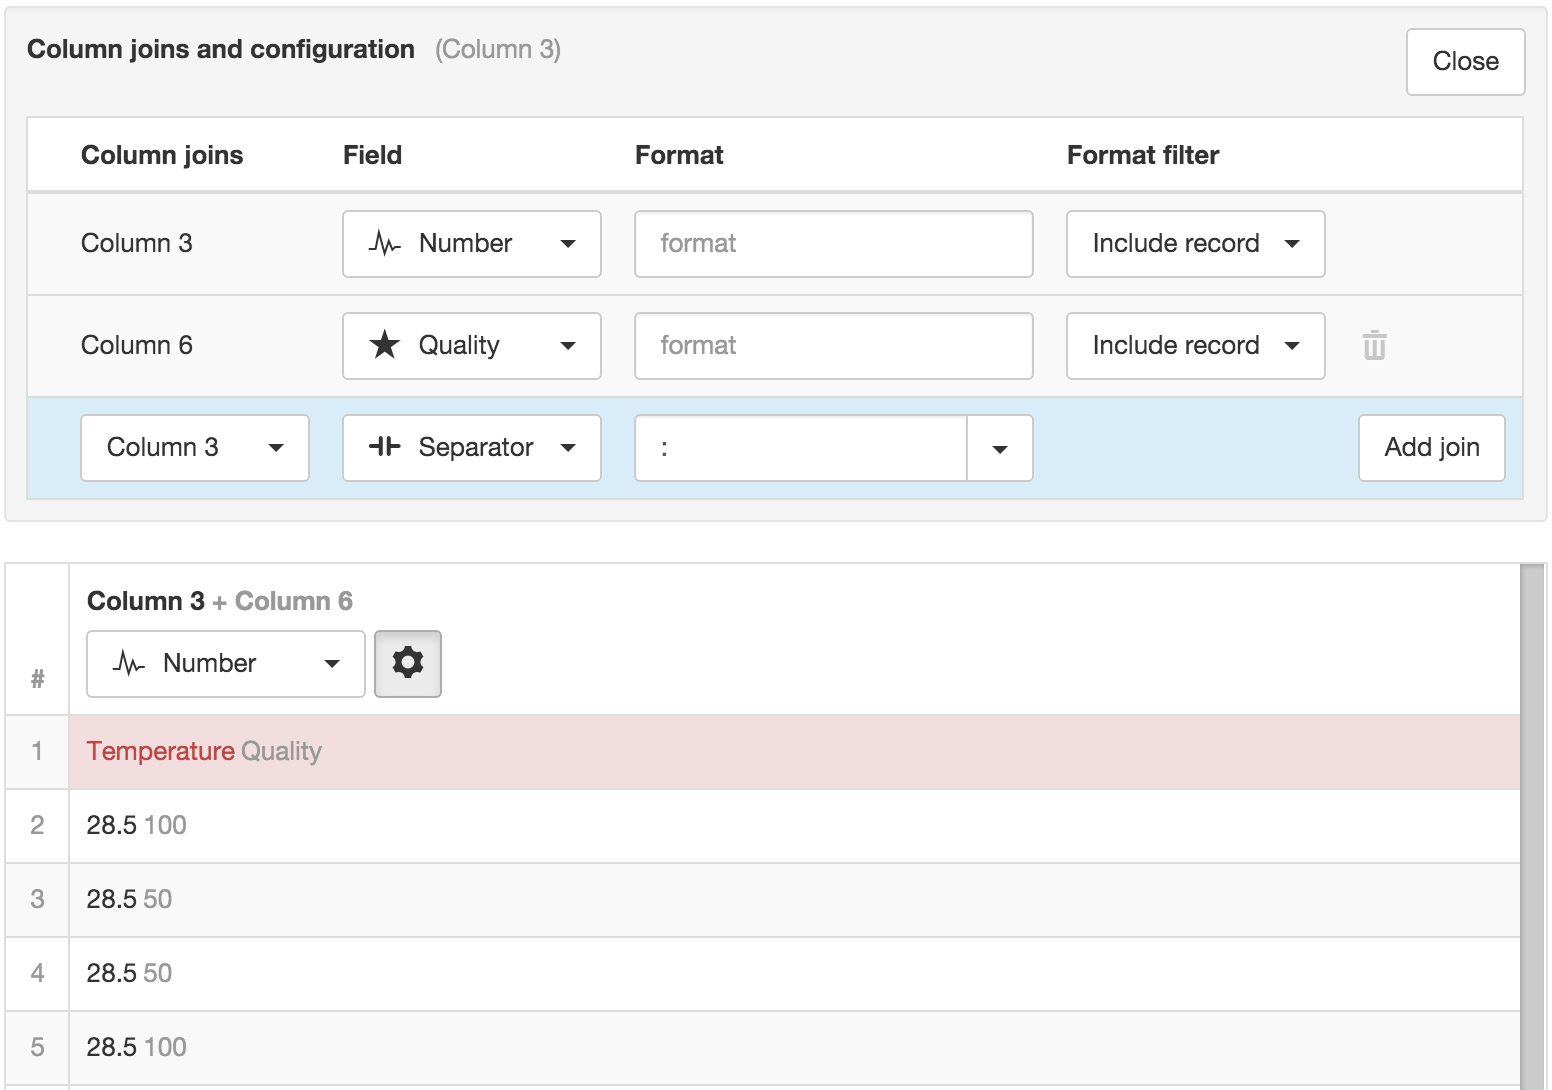
You can optionally specify a format and format filter to include or exclude the field or the entire record based on the data matching the specified format. In the example below all records will be excluded where the data in Column 6 (Quality) equals 50.